In this episode, we explore how to utilize the center guiding feature of the SCU6x Controller with two sensors, focusing on automatic adjustments and setup. We demonstrate the mechanics of center guiding using an actuator and explain the importance of using sensors of the same range. With detailed visuals, we show how to reset the guide point and align the material to the center of the machine.
Transcript
Show full transcript (1038 words)
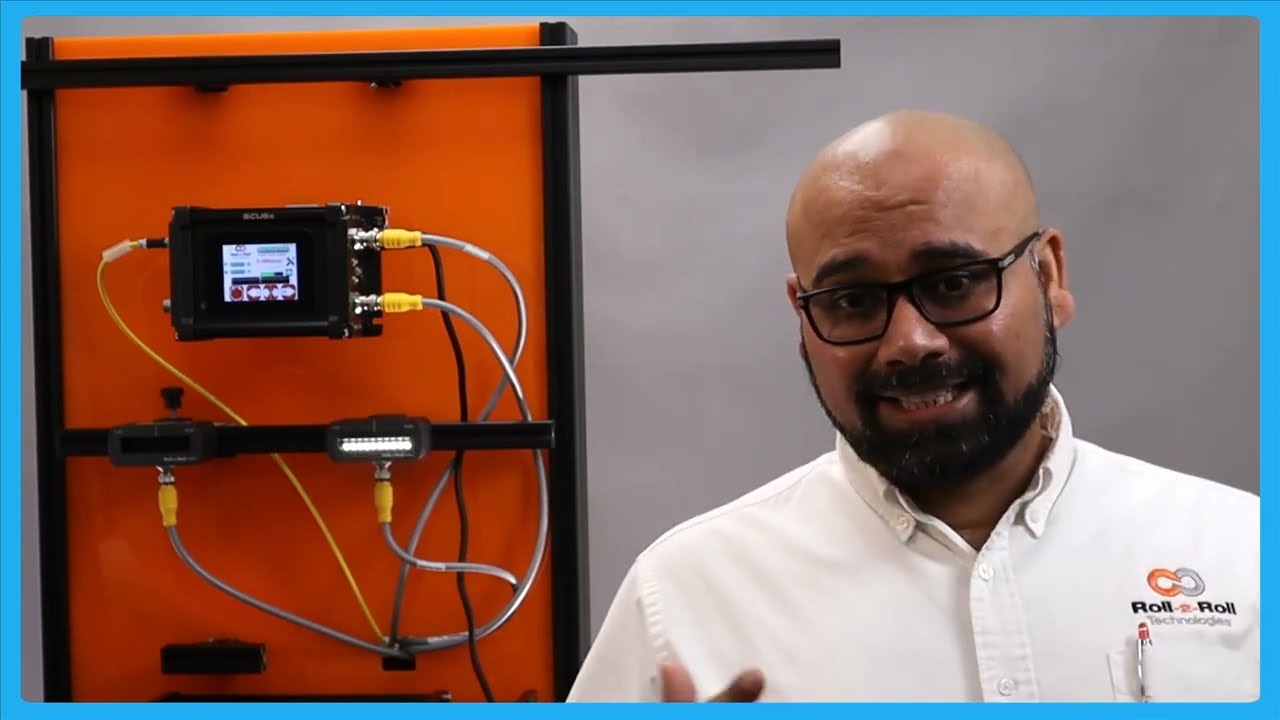
So, one of the other things with the SC6X controller is that we can do center guiding with two sensors and it can be done automatically. We talked about how to set up the different sensors for different configurations. So, please take a look at those videos. In this video, we're just going to show you how it works with an actuator, how things look, and how to reset the guide point for center guiding.
What we have is a couple of sensors connected here. One of the things with center guiding is that we would like the two sensors to be of the same range. Even though the system would work when you have two different ranges just on the display to make it simpler and not cause any confusion, it's better to use two sensors of the same range. Right now, I have an infrared sensor and a white light sensor just for illustrative purposes.
In reality, anytime we are doing edge or center guiding based on the edge of the material, we're going to always use an infrared sensor. So, let's go back to the screen and see how it looks. This sensor is set to see the left edge and this sensor is set to see the right edge. So, if I have a material that is presented, you can see that it's seeing the left edge and the right edge.
The green in the middle is showing the center line position. And in this particular case, we got the guide point offset to be zero. So if I set it to automatic, then the actuator is going to move back and forth based on if the center position is within the guide point to the left or to the right. And that's essentially how the center guiding works.
There are two main reasons why somebody would use center guiding. One is if you're changing web widths and you want to align the material to the center of the machine, then center guiding is the best option where you would place two sensors on either side and the those sensors are equidistant from the center line of the machine. So when the web width changes, you don't ever have to move the sensors and it automatically adjusts itself because it's going to look at the left portion of the web seen by the left sensor and the right portion seen by the right sensor. This is one of the common features that we have or common value proposition from our products is that our sensors can go anywhere from 48 mm up to 960 mm.
That means you can have a width change of about 96 mm up to about 1920 mm without needing to move the sensor. This provides a lot of range and flexibility to be able to have a system that can adapt to wick changes on the flight. The older generation systems might have some actuators that move the sensors based on the wick change. And more often than not, what happens is that those actuators have their own control loop that needs to be tuned.
The actuators can wear. These are the actuators for the sensors that could wear over time. And that creates an issue. And then the response time, especially when you do a wid change on the fly with those kind of systems, is going to be much lower than compared to a system with a sensor that is wide enough to cover all the width changes.
So that's one of the main reasons for using center guiding is that you can do different widths without moving the sensors whenever the width changes. The second main reason why you would use center guiding is that let's say you have an edge especially some kind of an extruded edge and the edge quality might not be great. So before it goes into a slitter you you have an edge and the edge is not that great. Instead of aligning to one edge of the web, in that case if you use two sensors and then use the center line position, it takes the average of the left edge and the right edge and does the measurement that is going to be the center line measurement and it's going to guide the web to the center.
This is one of the biggest advantage for using two sensors and doing the center guiding and especially when you have irregular edges, those edges variations are not going to be identical on both sides. This smooths out your edge profile and allows you to guide the web in the middle of the machine and that significantly improves the wound roll quality especially if you don't have a pretty good slit edge. So the advantage is that you are averaging based on two edge measurements and this helps in smoothing out the edge position. Those are the two main reasons why you would use center guide.
One of the other things that I want to show with center guiding is that you can do the reset guide point just like what we did with edge or center guiding with two sensors. Let me show you that. Going back to the screen here, we have the web now and the green position indicates the center line position. If the web is moved that way and for whatever reason you need to do that, you could do the same reset guide point and accept.
Now the guide point offset is there. If the edge position goes on either side, the actuator changes its direction back and forth. This is for doing the center guiding with the point offset. Now, like I said, it's not usual for you to change the guide point offset with center guiding just because you want the material to be aligned to the middle of the machine.
The reason why we allow you to do that is that let's say you had not installed the sensor at the right location to begin with. Instead of going and physically moving the sensor, you could just move the offset. And that's the reason why we allow a guidepoint offset even when we do center guide.

Check out our newest feature in web guide controls for our web guides, which allows you to change the guide point without touching the sensor!
Transcript
Show full transcript (241 words)
Today we want to show a feature in our web guides that allows for guide point adjustment We can do a fine guide point adjustment or a gross guide point adjustment without having to physically move the sensor The adjustment can be made on the operator interface by just sliding our finger across the screen In a previous video we talked about the fine guide point adjustment and today we want to go over the gross point adjustment For that we have to go to the operator interface screen, and there is a black bar on the screen and all you have to do is slide your finger across the black bar and it will move the guide point After that you will need to hit accept and the guide point will be set Unless you hit the accept button after moving the guide point, the system will not register the change in guide point If by mistake you touch the screen and move the guide point, the guide point will return to its original setting unless you hit the accept icon This is just another of our features on our web guides available in the control unit version 2.4 which is standard in all our web guides since June 2017 Fine and gross guide point adjustment, something we believe will be very beneficial for any converting operation Visit our website at www.r2r-tech.com for more information on all these features

Check out our newest feature in web guide controls for our web guides, which allows you to change the guide point without moving the sensor!
Transcript
Show full transcript (484 words)
Hi this is Pedro Velasco with Roll-2-Roll Technologies. We're going to talk a little bit about adjusting the guide point on our sensors for the web guides In many cases people want to be able to do this adjustment without having to move the sensor, and that's what we're offering now with this feature that we're going to talk about. Today, we have what we actually have two ways of doing this guide point adjustment. Ones a gross adjustment the other is fine adjustment.
We're going to talk about the fine adjustment Which is something that some of our customers have requested us to do. In this case we can provide you a fine adjustment of a little bit over .25 millimeters per step that you're going to adjust. Now this adjustment has to be done while the web guide is on and the machine or the converted process is running at the same time. We got set up on our test machine with one of our web guides with this condition.
As you can see I'm going to put the web guide on automatic and let's start our machine. So right now on our Display you can see that the two sensors are on. We actually Installed 221mm sensors on our machine in order to do a center guide. And let's say at this point.
It's the Web Material is centered on the web guide. If I want to move it to the right four to five millimeters all I have to do is press this button. and they'll recorded this there and this set. You don't have to do anything else.
It's already set that the guide point has been displaced .25 millimeters to the right and I can keep on displacing the guide for as long as I think the material is within the sensing window. Now if I want to place it back to its original position all I have to do is hit the center button. And it's in fact there. As you can see I don't have to do anything else.
All I have to do is press those buttons and it gets back there. If I went to move the guide point to the left, I hit the other Direction. As you can see it implements a little bit over 0.25 and it's excellent now. What is that value?
Well in this case is you can be very precise moving the web as you process the material. In another condition that we have, you can do gross adjustments, but we'll talk about that in a future video. now this is only available in our latest firmware version for our web guides, version 2.4 right now [this] is available for you, and actually give you more control of the web material as you're processing it. So thank you very much and let's hope to see you again in our next video