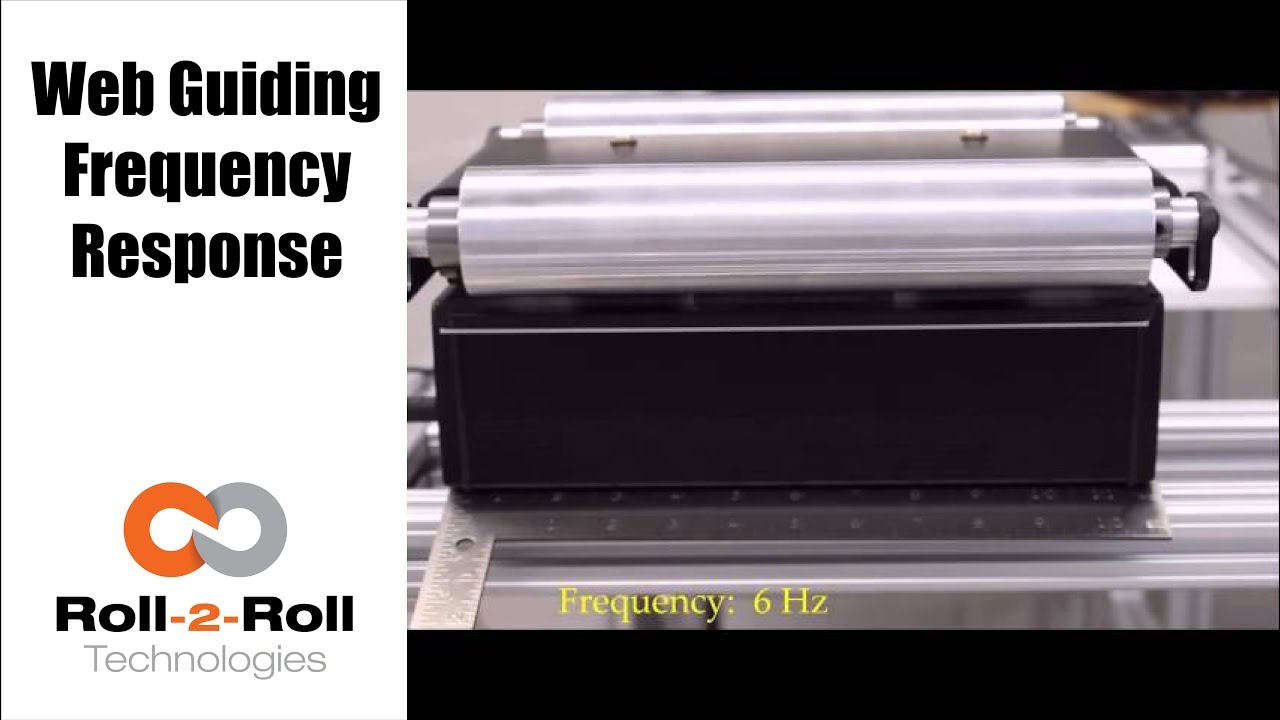
Roll-2-Roll Technologies provides you a closer look to the frequency response performance of our compact web guiding system from 1 Hz to 9 Hz.
Transcript
Show full transcript (71 words)
ARIS is an intelligent guiding system that uses a revolutionary fiber optic sensing technology technology to actually measure and control what position this video gives you a closer look to their frequency response performance of our 254 mm web guide from 1 hz to 9 hz. We have a whitepaper on our website that gives more details about the frequency response information. You can find a link for more information in our description below.

Roll-2-Roll Technologies web guiding system uses a revolutionary fiber optic web sensing technology to accurately measure web position. In this video, several speeds and several disturbance frequencies are introduced to evaluate the performance of the web guide for a sinusoidal disturbance commonly seen in web lines.
Transcript
Show full transcript (106 words)
ARIS is an intelligent guiding system that uses a revolutionary fiber optic sensing technology to accurately measure web position. In this video, we use a two guide test machine to introduce several speeds and disturbance frequencies. One machine creates the disturbance, while one corrects this disturbance This test lets us evaluate how our machine adjusts to these disturbances. Watch the red laser to difference between when the controller is off vs when it’s on.
We have a white paper on our website that gives more information about the performance of our guide systems. For more information, please click on the link below in our description.

Roll-2-Roll Technologies shows just how easy it to set up its web guiding system. The automatic function does all the work, so you don't have to. Just press the automatic button and let it roll.
Transcript
Show full transcript (248 words)
As a real plug-and-play system, ARIS adapts to any material, requires no calibration, and very little set-up time. First plug in the sensor to the 12 prong outlet in the back of the machine, using the guide notch that aligns the plug to the outlet. Once the sensor is plugged in, tighten the lock collar to hold the sensor cord in place. Slide the sensor into the sensor guide rail.
Make sure the middle of the sensor is aligned with the material’s edge. Once connected to a 24 volt power supply, the user operator interface featuring language independent icons will come. A green sensor indicator will verify an operable sensor. Above the icons you will see the material edge, position indicator, represented by a green and red bars.
When the material is in correct position, you will see one red bar and one green bar. If it's incorrectly placed, you will either see no green bar or red bars on both sides of the green. Once the sensor has been aligned with web, secure the sensor using the thumb screws. When the screen turns on, the automatic/manual icon will indicating the guides last operating condition.
A green icon indicates the guide is in automatic operation. A red icon indicates the guide is in manual operation. The operator can change the condition by pressing the icon once. ARIS does most of the work through its automatic option, so press the icon to set to green and let it roll.
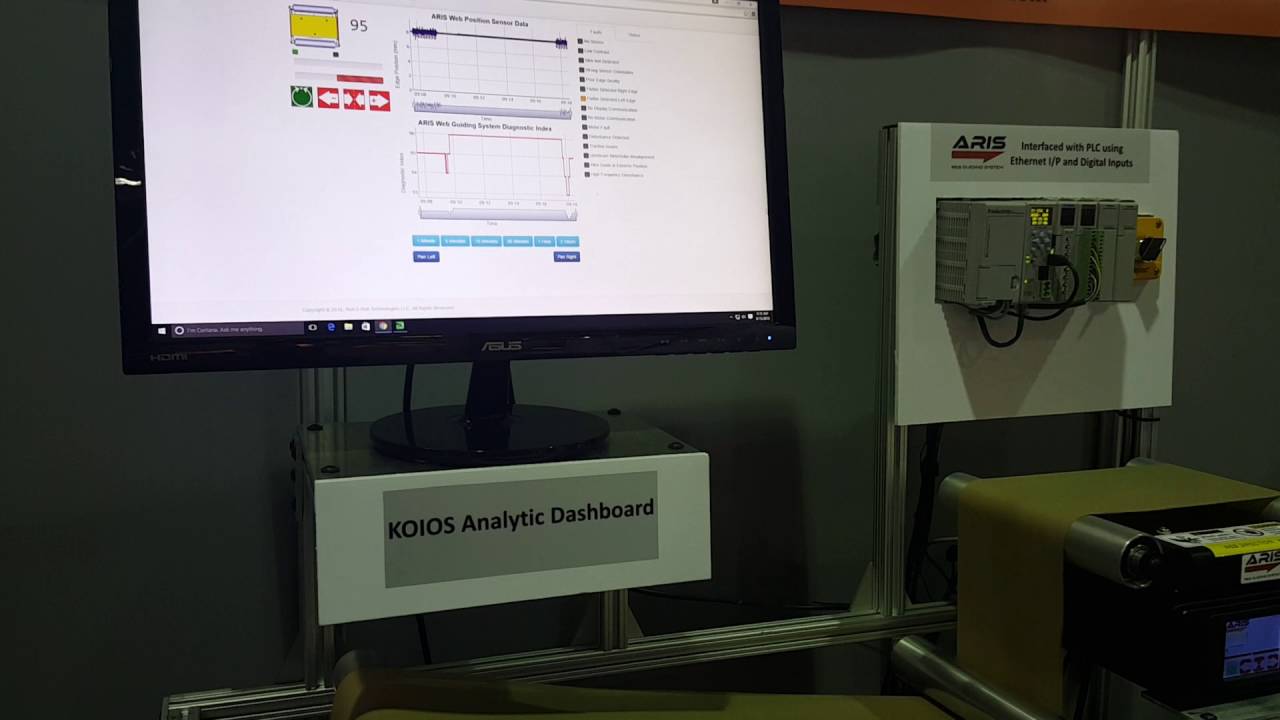
KOIOS is an intelligent data analytics system that can detect issues in the process using the data from ARIS Web Position Sensor and Web Guiding System.
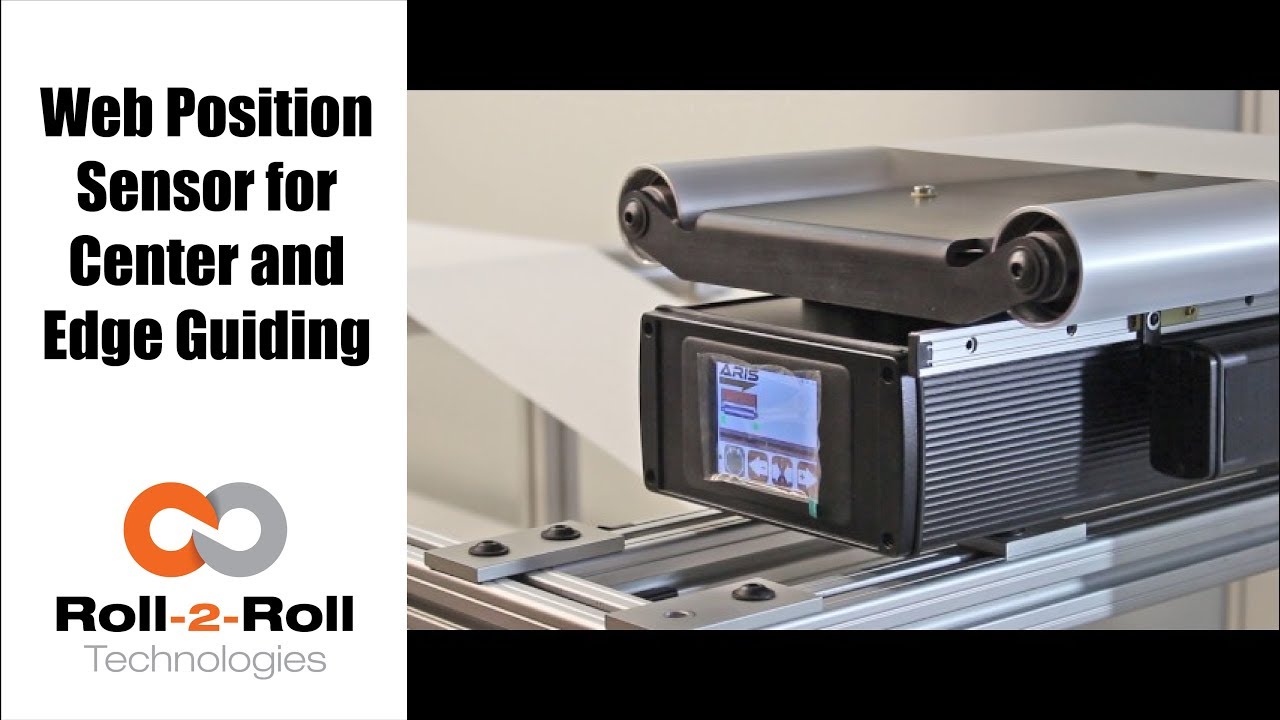
One of the many features of our wide width sensors is the ability to function as a sensor for both edge and center guiding without the need for calibration. See how easy it is to use one sensor for both center and edge web guiding applications in this demonstration of switching from edge guiding to center guiding on-the-fly.
Transcript
Show full transcript (196 words)
Today we want to show you another of the features of our sensors In this case, we have a 221 mm sensor, we can use for center guiding and at the same time for edge guiding, you just by flipping on off switch. Right now We have it set on a 15 inch guide. And it right now set up and run, as a center guide. However so what I'm going to do now we don't recommend you do it on your machine but just to show you how easy it is to just switch the one from center guiding to edge guiding.
So right now as you can see its set on center guiding. Now, I'm going to put the web guide out of automatic to manual and then I'm going to slide the sensor all the way for the position where it's going to be edge guiding on the same position that we have it right and then I'm going to turn it back on and and do edge and find sensor, and I'm going to turn it back on. You can see the maintain same position It's doing exactly edge guiding in the same position.

Check out the many capabilities our sensors have in edge, center, width, contrast and mark sensing. Our sensors require no calibration. These advanced sensor capabilities are shown here in this video.
Transcript
Show full transcript (756 words)
This Pedro Velasco with Roll-2-Roll Technologies And we want to show you a little bit more about our sensor technology and its different applications. So here we have a demo set up to show some of the features that are sensors have. Right now we're showcasing the 221 infrared sensor and on the left side you'll see the forty eight millimeter white light sensor which we used mostly for contrast sensing so we have already set up the Infrared sensor and we're going to do first let me show you the in the edge mode all the capabilities that it can do. So they can do so right now number one.
It can actually tell you exactly where the sensor is mounted and Which side is that it's that said its absolute sensing so as you can see it automatically detects a sensor And then it's affecting the edge on this side, right? but I Want [to] change it. Just press here if I come from this side? See it automatically detects no calibration needed for this operation.
Additionally we have other characteristics that we can do with this we can do something with this same sensor. We can measure width. We set it up to monitor in this case. It can be a pass or fail condition so now there's no material, so I'm gonna put a material here, and then I'm going to set a Condition and I'm going to set it up.
Let's say I want to accept two millimeters off That's accept so now it has recorded the distance that just width that I want right? but put another material, that's a different width It will leave me a fail condition because it's beyond the limits that I've all already set up over here So that's another characteristics of our sensors. We can also show you another which is the string mode right here for the 221 sensor if I present one string? will actually see one string.
But that is the same time you can also see two strings and you can see even Three and many more right, but the best thing that we can do is we can actually also give you the distance between the strings between the edge of the strings, so in this case is telling us between the third and First string there's Thirty six millimeters right however we can adjust this, prepare you with our system so that they can actually tell you the difference between individual strings Now let me hook up now our White light sensor so as you can see I'm just going to unhook our 221 sensor infarred sensor And then I'm going to just hook up The light light sensor as you can see it turns on immediately It detects it and of course a white light sensor can do edge guiding. All right Just this the other sensors You can do it from either side, it auto detects. But I can also select the mode So right now. It's going to do contrast sensing So it will tell me The position this contrast as you can see by that?
Green and Red bar right, but I can also tell you Not only that I can tell you the width of that So it gives us a 9-millimeter width, if I change it and see, it changes. of course, if I Had a steady hand this little better, [okay]? [okay], so that's one of us the many features that we have and that's with the white light sensor the contrast capabilities also, we [can] also give you a Mark so let's say for example. You have something like [this] We wanted to detect the mark, so as soon as the sensor sees it It will tell me that the mark is detective.
Mark detected. This comes across, so this has multiple applications if you had For example. We can actually give you the distance between marks through a one of our algorithms But the best thing we can do is, we can also do this with ultraviolet light and then you can have a mark with UV ink which can also be detected. So these are some of our capabilities that are sensors can do.
Of course now we're looking for other applications As we do our research in our developing products by right now these are available to you. Just give us a call or visit our website, and you can actually see your products there. Thank you very much

We are often asked how to calibrate our sensors. This video will show that you don't need to calibrate our sensor.
Transcript
Show full transcript (387 words)
Hi, this is Pedro Velasco with Roll-2-Roll Technologies We want to answer one of the questions that reader in e-news sent us. His question was literally just how do you calibrate your sensors and one of the things we do with Roll-2-Roll Technologies with what we have developed It's that you have to, you don't need to do any calibration of our sensors. Right here today I'm going to do a very short demo using one of our demo units plus two of our main sensors, the 48 millimeters White light sensor to use for contrast sensing and edge sensing and then our white 221 millimeter sensors infrared which we use for edge detection but also for measuring width and center guiding. So let us show you how.
In this case you notice immediately as soon as I plug it in the sensor came on with no need of any other procedure in just coming you know. Now as you can see right now on the screen the sensor I have to go and tell it find the sensor It's searching and then as soon as I put the material It detects where the sensor is at. As you can see it's actually detecting the material as it goes through Ok so now let's say that I want to change the sensor for some other reason and now all [I] do is just unplug the sensor And as soon as I unplug it the display tells us that there's no sensor there and at the same time I'm going to plug in one of our featured sensors the 221 millimeter sensor which has many capabilities like for example We can do edge detection, it can do width sensing and immediately it detects a sensor there. However I'm going to do a search sensor and the same procedure and as soon as I put material it detects the material.
Now it is only guiding off on the edge of the material on the leading edge. That is how simple it is Change Sensors and as you can see there's no need for calibration We hope that this video has helped you understand a little bit more about our about our technology And we will continue to show more stuff, but especially the features that are sensors have. Thank you.

Web width measurement is a common need in the converting industry. This video shows the web width measurement application with the WPS.
Transcript
Show full transcript (275 words)
Hi, this is Pedro Velasco with Roll-2-Roll Technologies. Today we talk a little bit as things that we can do with our sensors. Now our web guides are capable of doing edge guiding or center guiding with just a touch of an icon and that is because of our sensor technology. Now our sensors on their own they can actually have many other features that deal with that application.
For example this 221 mm sensor, we can use it to monitor the width of any material that is within the 221 millimeter sensing window. In this case they can measure the width, it can also detect that there are differences in the width and therefore send out a signal to tell you that there's something wrong with it. Now we can also do that, let's say that the sensing the material is wider than the sensing window. Well we can also use two sensors we can use two 221 mm or 2 48 mm and then hook them up to our sensor control unit and keep on doing that same application which is measuring the web width or at the same time controlling or monitoring the web width in case you want to make sure that the material is within specs in width wise.
This can be done with any of our sensors. This can be done with our 221 millimeter sensor the WPS 221 IR or this can be done with our 48. There are 16 mm sensors too and also with our new sensor the 440. Now this is some of the features that we have and we will talk some more about other features in future videos Thank you very much

Check out the latest edition to our product line. The ARIS WPS 440 can do many things, but in this video we show the thread counting and monitoring applications.
Transcript
Show full transcript (261 words)
Hello, this is Pedro Velasco with Roll-2-Roll Technologies. Today we're going to talk a little bit about one of our sensors in our web positioning sensor line. So imagine this, what if you have a line where you're trying to run several strands like wires and material so you want to monitor if the wires are there or not. In this case the WPS 440 can actually give you that application.
In this case, I have set up right now seven wires that in the production line probably running over the face, separate from the face that would be running across it right. So if I eliminate, even one take it away, you would actually get a signal telling you that it has been removed, it's missing and that would be one of the features of this product one of the applications. At the same time, if these wires come together then it also can tell you that that is happening also tell you that there's a problem in the system. Additionally it can actually give you just measure each one of the wires and give you an average of the measurement of the width of each wire and then at this same time tell you there's a problem with your system so this is one of the features of the WPS 440- 440 millimeter sensor window and included with the SE unit and closed within the housing unit.
It's all available to you through our Roll-2-Roll Technologies. You can see more information about the sensor at www.r2r-tech.com

Do you need to find the IP Address of the SCU5 controller? See our video to learn how the IP address can be found.
Transcript
Show full transcript (541 words)
Hi this is Pedro Velasco from Roll-2-Roll Technologies. Today we want to show you how to find the IP address for ARIS sensors or web guide controls are equipped with the Ethernet IP connectivity option. As an example today we're going to use the WPS 440 IR which is a most recent additions to the ARIS WPS sensor lines and this one has an inner router to access the network so that we can monitor this later on. So first we're going to connect an ethernet cable to the M12 connector which is on the side port of the ARIS the WPS 440 IR and then the other side of the connector we're going to connect it to the router in the rj45 Ethernet connector jack Once it is connected, then we go ahead and connect the power to the sensor and then we verify that the connection is correct by looking at the blinking light on the router.
Now after this has been achieved then we can go ahead and proceed to a computer to actually go and find out the IP address for this particular sensor. So by default the router will assign an IP address to the device and this will be a dynamic IP address. Now to find the address you will need to access the Internet through any computer from which you will monitor the device in this case we searched online for Anybus.com and then we look at the support so we hit the support tab. Then we go to the selected product icon and from the select your product Icon you go to the Anybus IC icon and you click on it.
Then you go to the Ethernet IP and here you have a list of software so you're going to download on the software section when the one that says IP configuration utility for module TCP IP configuration. Now you go through the whole process of downloading the this software but once you download then you hit your Start button on your screen and just go to the HMS as you see here and open that up and then you see the IP configuration. When you click on it, it will automatically open this this window right here. Of course, sometimes when you're doing the first time this will not show up so you hit scan and it will scan for anything, any IP addresses are available.
So in this case here you have access to your IP address. Ok, so let's say for example you want, this is a dynamic address, but you want to establish a static address so all you have to do is just right click on the on the line and then you see the configuration tab. Just hit configuration and then you can actually set your static IP address on this window right here. So we mentioned before how to find an IP address for one of our sensors or web guide controls.
It's a very simple procedure as we showed and we hope that this can be of help to you when you are using our products on your operations so again thank you very much and just keep on looking for other videos. Thank you