SCU6x Controller Calibration for Precision Width Monitoring
In this video, Aravind Seshadri from Roll-2-Roll Technologies walks through the one-time calibration procedure for the SCU6x Controller, essential for precise width monitoring. This calibration adjusts for conditions like sensor placement and lighting variations, ensuring high-resolution measurements. While not necessary for broader tolerances, this detailed procedure is crucial for high-precision applications. Operations in the automotive and medical industries, where quality control is paramount, can particularly benefit from this feature. Specific benefits for slitter rewinder processes include continuous, accurate width monitoring without the need for intermittent sampling, enhancing overall efficiency.
00:00 Introduction to Calibration Procedure
00:14 Understanding the Need for Calibration
01:11 Calibration Process Explained
01:48 Practical Calibration Example
02:50 Batch Calibration for Multiple Samples
03:41 Real-World Application and Benefits
05:00 Conclusion and Final Thoughts
Transcript
Show full transcript (800 words)
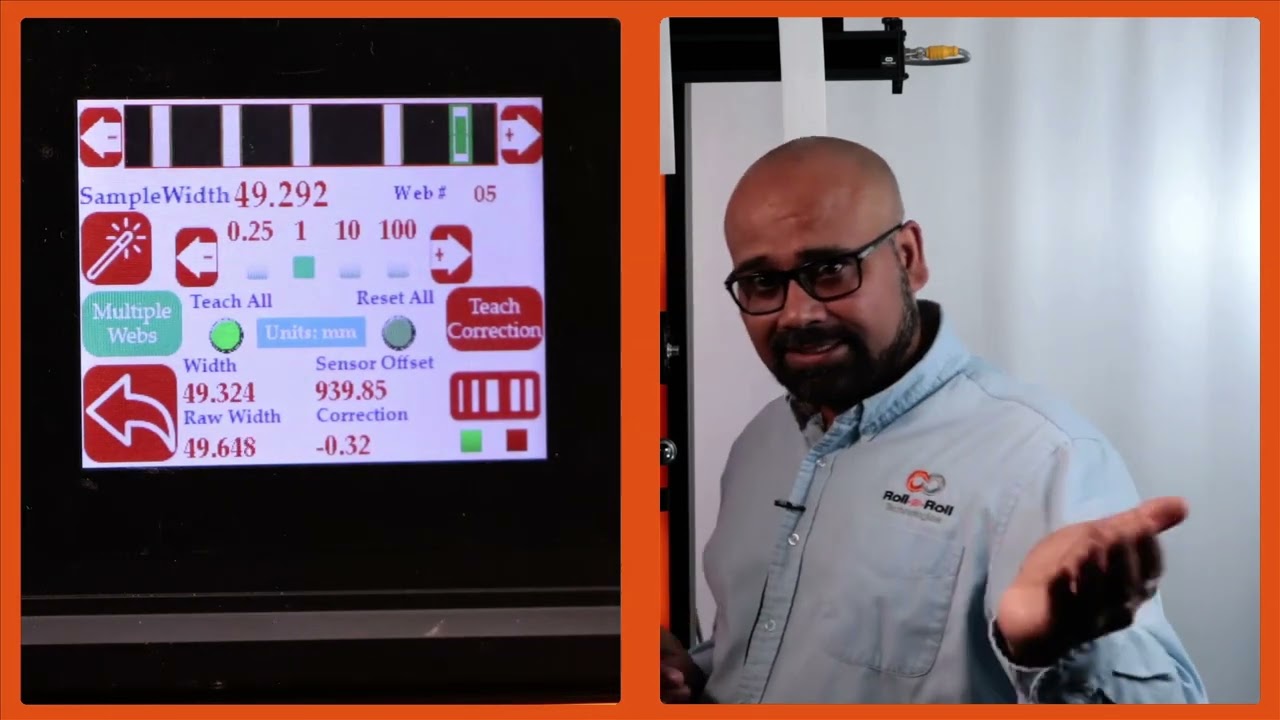
One other thing we need to do whenever we are initially setting up is um onetime calibration procedure that can be done on this screen. The idea for this is that we have the ability to calibrate our sensor for your conditions. We do have a calibration done in the factory, but when it's being installed, the sensor might be installed at a different distance than what we typically expect. And there are other things with the lighting and contrast that might change some of these parameters.
So, this calibration is necessary only if you're looking for a higher resolution measurement. For example, if you're looking for a tolerance of plus or - 1/16th of an inch, you don't need to do any of these calibration things. But any anytime you are below that. So anytime you're below a millimeter or below a 1/16th of an inch resolution, you would need to do a calibration.
This is done just for that particular setup. Once you do it, you don't have to do it for the rest of the run. It'll be stored and you take that calibration value. What does the calibration do?
Essentially, I have a material or a sample of a known width and the sensor is providing a raw measurement. We're going to compare those two and then say the calibrated measurement is based on the actual sample width and whatever the raw offset is, that's the correction we are going to use for the rest of the measurements. So that's indicated here. So that's basically saying what is the correction from the actual width to the measured width.
That's essentially what the calibration is. So it's just creating a offset. So for example, let's say the sample width is 46. To change that, you press whatever you need to increment by and change that value.
I am going to put that as 49.244. Right now it's measuring 49.293. If I want to teach this, my sample width should match my measured width. To do that, press this teach icon and then press accept.
Now it has applied a correction. Essentially the raw width plus this correction gives me my actual width. And that's pretty simple. It's just a regular bias or correction that we are adding.
Nothing fancy about this calibration. So you can do that for all these other materials. We don't necessarily need to do this if your tolerance is 1/16th of an inch or 1.5 mm. We don't need to do that.
But for some customers looking for a higher resolution, you do that calibration procedure. Now, just to make it simple, you can enter all of these sample widths already and then you can do a one-time teaching. Let me show you how that works. I'm going to enter this sample width here.
Okay. So, if I want to do all of them together, I'm going to press this teach all button. Make sure that it's highlighted. And then I'm going to press this teach and accept.
Now, all these samples will have a correction. Before we had everything as zero. And if I now scroll through web five, web 4, web three, web two, and web 1, all of them now have a correction. So it's just a quick way for you to do this.
The general use case for this is that let's say you are a customer in automotive or medical and you have a QC process where you are only sampling a part of your product. You are setting up your slitter. You pull the initial sample after the operator has set up the slitter and you take that sample and you're doing a QC on that. Now, essentially what you're going to do is take that sample and enter it like what I have here.
Then you're going to do a teach all. Once that is done during any part of the run, we are taking that measurement online in line 100% of the time. So that's the biggest advantage with this system. In your typical process right now, you might be doing one sample at the beginning of the run.
At the end of the run, the operator needs to stop the machine, take that sample, give it to QC, take the measurement, and then everything is good. You run it, and then every time the machine is stopped, there is another sample that is taken. So, this is a random sampling process with a lot of time involved between one run to another. and we completely eliminate that and allow you to keep running the machine and monitor the width all the time.
So that's the biggest value proposition with our system. And that's essentially it. So that will allow you to calibrate each of these samples and be done with it.