The second part of the SCU6x Controller Tutorial explores the SCU 6X controller with a focus on its functionalities and capabilities not covered in the first part. Learn how to navigate the home screen, perform manual jogging, set servo centers, and operate in automatic web guiding mode. Discover the safety features, guide point adjustments, and the differences between edge guiding and center guiding using sensors. This tutorial provides a comprehensive overview of the controller's interface and its operational capabilities.
00:00 Introduction to SCU 6X Controller
00:36 Understanding Actuator Options
02:10 Home Screen Functionalities
02:26 Actuator Position and Jog Commands
04:21 Servo Center and Jog Buttons
07:44 Manual and Automatic Web Guiding
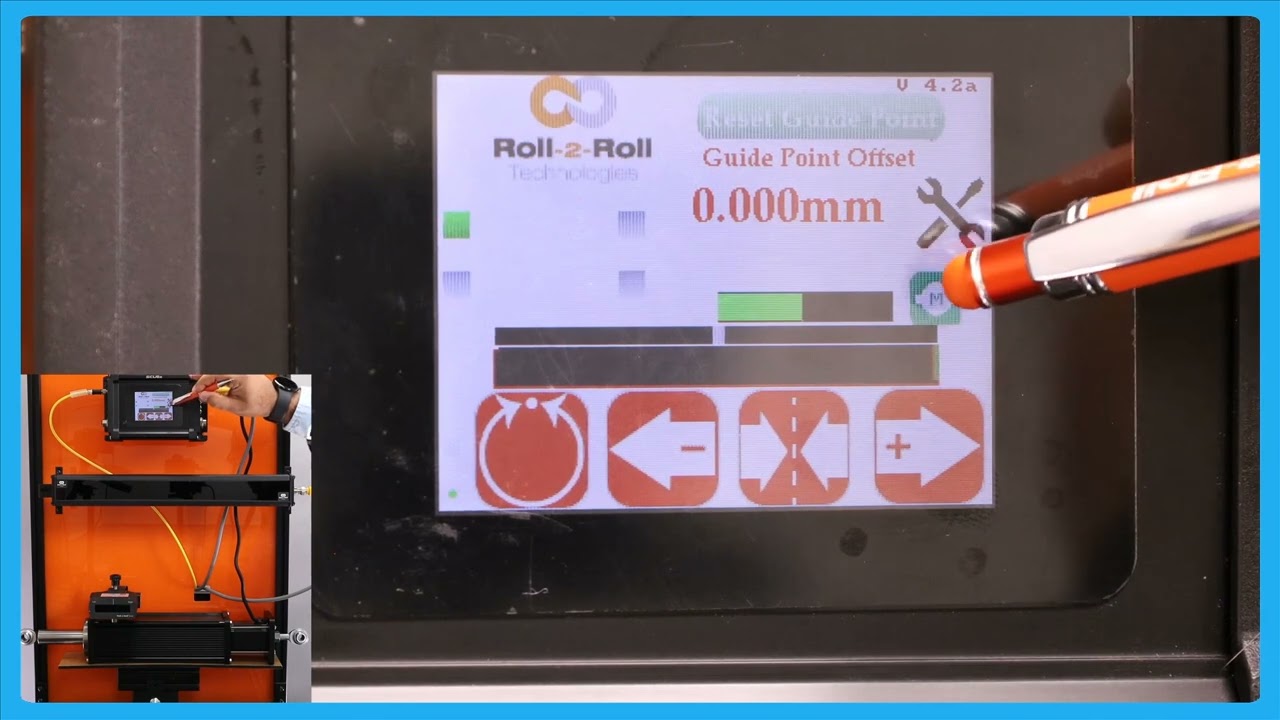
11:53 Fine Guide Point Adjustment
15:10 Resetting Guide Point to Zero
19:00 Center Guiding with Sensor
Transcript
Show full transcript (3301 words)
hello everyone this is Aran sadri from Roll tooll Technologies today we're going to look a little bit more about some of the other functionalities on the home screen or the operator interface screen and specifically related to actuators so what we have today is our SCU 6X controller and this is SCU 6X MD and we have one sensor connect Ed to it then in the motor port we have an actuator connected to it right there seu 6X MD and there is another option seu 6X mxd both of these options are allowing us to connect different thrust actuators for example this particular one Su 6X MD has the low thrust option where we have an actuator that can drive up to a about 300 lb fors of trust anything related to intermediate web guiding this will be the actuator for that this particular actuator can draw up to 4 amp of Curr when we go to a higher prust the part number is going to be a little bit different it's going to be SCU 6X mxd where the X relates to the extra in that we need and that particular one can drive up up to about 500 lb of crust so a shifting stand with the total weight um of though more than about 5,000 lb can be driven with that actuator the only difference would be the connector here would be a little bit different on this side now it'll be a high thrust a high current connector and then for that particular actuator we would also need a different power in the Dual re power input will will have 7 amps up to 7 amps for that we also can do up to 48 H DC everything that the operator need should do on a day-to-day basis can be done from the home screen for example things like putting the web guide in automatic or manual joging the web guide back and forth and then putting the web guide in the C Center mode the first and foremost three with the with regard to the actuator is this actuator position bar this bar is going to indicate the position of the actuator in this position is the electronic position that is being read by our driver right now the actuator is in the middle as we jog the web guide you should see that actuator position to be changing and then there's also visual indication of when the actuator is getting new near to its extreme position and that's indicated by this um yellow bar and then if you keep moving it turns red which means that there's really not much left in the actuator position so this is indicating that it's reaching its stroke Lane now in terms of the stroke of the actuator these are all electronic limits that we have in the controller in subsequent videos we will talk about how one can change those limits based on what the actual actu stroke T takes like that so this is the if I press this one you should be able to see that go draw the left and it'll do the same thing if it goes to a certain position where it's getting closer to its extreme it's going to be yellow the keep going called the dead red and then if it's off the read even if the actuator presses this button now nothing happens and that's because the actuator has reached this limit there so it will not move in that direction however it will move in the other direction so that's the actuated position more then we saw the jog left and Jog right command there now if you want to put the web guide in Servo Center basically means different things for different types of web guyses but essentially putting the wind guided a U pro position so that it add enough stroke to go on either side um of the servo Center position then you can press this button and this button uh it's a single press button and when you press that it will bring the web guide or the actuator to its home position or what we call as the zero position so one difference between the jot buttons and the servo Center buttons are that these jot buttons or what we call as momentary buttons that means that you need to keep pressing there for the actuator to keep jogging as soon as you let go the actuator is called a stop joging in that Cas both of them are like that um Circle Center is more like a push button and it will actually tell you the Stak in which it is there for example if I JN it and then if I put it to server Center this is in the servo Centric state so it's going to be green and and until the Sero center operation is done it will stay green and once the oper operation is done it will turn back to Red so there's no need for us to keep pressing then button it's a one time push button C so click just to give you this again when you press the servo center it's going to uh bring the actuator to its home position once the operation is done once it reaches the home position it's going turn back to um red again there are different ways in which we could do the servo centering operation which will be handled in a future video essentially depending upon whether we are just using an electronic limit or if we're using a physical proximity sensor to do that so those are for the jog left Jog and turbo Center one other thing that we have is basically this actuator position bar if you press that motor icon on the home screen this let you see a bigger view of the AG regor position K in this case if the web CAG moves back and forth you can see that actuator bar will move back and forth one thing to note about this Servo center button is that this has a different functionality than what it is in the home screen so we recommend that you take a look at the subsequent videos about this functionality before using this so one other option that we have is that if if the operators are not allowed to change the servo Center position then in that scenario the controller can be locked in such a way that the operator cannot change that simple Center position then if you click on this motor icon now it'll only show you the jog length and the jog button and it won't show you that re reset Servo center button so the operators can just view the actuator position and not be able to reset the C Center position so that's the difference between having that enable and disable this is about moving the actuator manually to facilitate loading and unloading the roll but the real thing with our system is basically it does guide the we automatically to its desired okay this is about moving the actuator manually to facilitate loading and unloading the r but the real thing with our system is basically it does guide the we automatically to its desired position so just to show you that let me present the we put the web guide in automatic mode so as you remember that the gray bar in the middle is basically our G point and if we are on one side of the G point the aerators will move one way if we are the other side of the G point the actuator for M be way and it's that's out it's stating the web and then the actuator position bar indicates what the stroke of the actuator is and obviously once it reaches its stroke it doesn't matter how much error we have the accelerator is not going to move in that direction but if the eror F on that direction then the actuat is willable and he that in for BL so this is the automatic feature of our web guing system and right now I'm using a single edge to gu the material and it doesn't matter if I have one Edge or two edges it will do the same thing so one other feature that we have is that we have an automatic web to Tech signal in a previous video we talked about this which is that web detect signal we can use that information to stop the actuator for movie even while it's in automatic mode if the we breaks so just illustrate that I'm going to show then and sping the web Ming toward and you can see that actuator position might keep the web braks and there's no web in front of it then the actuator stay stays put and this is what we call as lock on Lost Edge essentially a functionality that ensures that the actuator doesn't get cocked to one side or the other if there is no web in the fielded view of the CER and as soon as the web comes back it's going to start dating it when there is a web break it's called start and hold it positioned and this is essentially for detecting the uh web break and then making sure to stop the actual in its current position so that it doesn't disrup the the operation once the TR web is turnning back in okay in a previous video we looked at the G Point offset basically how to reset the G Point again that is useful when you have a white sensor and you uh present the web like different notations so just to go for that one more time here I've got a white sensor here and the web is positioned at some point I'm going to go in and reset gate Point except that's there and if I put the we p in automatic it's going to stay in that position and if I need to change that dat point to a new location when it's in manual and we can still do that the we isit this new location and I'm going to do the reset cway accept and when I put it in auto in scr the actuator is staying in position because the web is at the night Point location and if I move the web to one side part the other it's little stop it's going to die with respect to that c one that's the briet cake one now there are situations where you are guiding the web you got it at the SP but you want want to make a fine adjustment and with the traditional sensors there might be something like a micrometer and an operator needs to reach in and try to adjust that screw on the micrometer to move it back and forth to do what is called as a fine dat point adjustment so think of it like a lamination process you got the wind align guiding but you want to change that gate point just a little bit you don't want to make too much of an adjustment and you want to do that while the Wim is running and that is what we call as a fine gate point adjustment how to do the fine gate point adjustment right now the G Point offset isus 119 mm and if I want to change that just a little bit then I if I want to increase that I can press that increases that the web guide is not going to move until it goes away from the B so just to illustrate the SP thing now it reach the limit for the dead man and it's continuing there that's our fing point adjustment so this allows you to be able to M uh make very fine adjustments to the guide point again the plus arrow allows you to increase that gate point and minus Arrow allows you to decrease that gate Point that's what is called it a fine gate Point government and this adjustment can be done only when we are in automatic mode and then each press of B will take1 mm I think that's what it looks like1 mm to move the gate plan one of the reasons why we have this icon where the operators can see of either view of the actuator position is those scenarios where an operator is farther away from our controller and they want to make some subs sequent adjustments to the position or essentially the DAT Point using the M operator interface but they want to make sure that adjusting the gate point doesn't make the actuator to reach its limit that's one of the reasons why we have that right now the web guide is in automatic mode and the web is staying there it's not moving but if I moved the web gu you can see that you can the actuator bar changes if this is just a bigger view of what we had in the home screen and the reason why is uh a bigger view is allowing The Operators to see this interface from a longer distance while they're making adjustments to other parts of the machine so that if the actuator reaches its limit it's pretty evident and they can make adjustments to the other part of the machine so that it doesn't the guy doesn't lose its stroke uh during guy this button you can Beed either in automatic mode or in manual mode okay one other feature in terms of resetting the G point hset on that we have is there are some occasions where you want to reset it to zero and this has to be done with extreme care and only people who know what they're doing should be able to do this and that's because this is very powerful and changes the date Point immediately so there might be some occasions where you want to absolutely reset pick 8. to0 the best way for us to do that is while it is in automtic did you press the servo center button it's going to show you that hey you want to reset the G point to zero do you want to accept it obviously if I accept it the web visit different location it's going to go all the way to one side the actuator is going to go all the way one side because it's trying to correct for the we position again when you're in automatic mode if you press this Servo center button then it would allow you to reset the G point if I press accept the T point is going to be in the middle now Bally the actuator is newly because it's trying to bring the web to its um to the P Point reference that's the way in which you could reset the K point to Z one other thing that happens when we put the web guide in automatic mode is that this tools icon is going to disappear um I'll do that and you can notice that the proven automatic the tools icon disappears so essentially when the web guide is in automatic mode the operator cannot go in and change any parameters related to the edge Center or contrast or anything related to the speed the gate none of those parameters could be changed while the webite is aide just a safety just so that we don't intentionally cause any cor when the webc isn't so that's why that one is the only screen that the aerator can navigate to is going to be this screen and that's going to show you the actuator position in a bigger view the operator cannot go into any other screen while in automatic mode the other thing that you're going to notice when the web guide is in automatic mode is take a look at these sensors so I put it in automatic mode the buttons so those buttons are disabled again same idea when you are an automatic we don't allow the operator to change the orientation of the sensor so if they can't enable or disable the sensor they cannot switch from one sensor to another sensor all of these things have to be done a pror before they put it in the automatic one and then again reset dat point if you put it in automatic mode that disappears so they won't be able to make any big adjustments to the G point the only exception to that is to reset that gate point to zero as the only that they can do and that's the reason why we say that when you do a reset CR point to zero to be really careful um and do only and that's the reason why we have that accept button so if somebody presses St by the St we don't necessarily have to take that command unless the operator intentionally presses accept if it doesn't press the accept button then it'll go back to the previous gr point so the next thing that we're going to look at is we showed how to do Edge guiding with a sensor now we're going to do how to do cting with the sensor so I'm going to change this orientation sensor orientation so that sensor one can detect voltages of the web and that's what it it's detecting and as you remember from our previous video when we do c and the guide the ref reference for the web is not based on one Edge actually based on the two edges so that's what is presented by this green bar so if I move the center line of that web to this green bar to this point box act and then put it in Auto then when that centrer line changes position that's how we're going guided essentially Center guide so what is the advantage of Cent gu is that when you hand weight changes you don't have to move the sensor as long as your G Point offside is the right loation so for example if I put another web that's wider you can do a on the Fly wi change with one to another web wi and it will automatically guide and you wi in a C position and that's one of the biggest advantage with a center diing solution is that when the wit changes let's say it have some varability in your brid your web will always be presented to the center line of the machine as long as the center as long as the sensor is set up properly then you can bring it to that Center Line position with respect of the quarter in or half an inch web with L so in terms of Center guiding Center position this represent by the green bar and then the web guide is going to keep that Center position um I'm moving the actuator back and for so that green bar aligns with that gray gray P point and cence as it should so that's the main difference would be Edge tiing and Center Tiding again you still have that option of web Brak so the web braks it will stop actuating and it will start back actuating but the web this dressing and then obviously it's going to do it it's going to stop until the web reaches its B Point reference if the WID changes doesn't matter as long the red WID the Cent line that so that's Center D with with a single sensor