This video shows how to set the actuator parameters on the SCU5 controller.
Since Roll-2-Roll Technologies offers several different actuators from different vendors, this allows for lot of flexibility for the end customer.
👉🏻 More information on the actuator are here: 🔗https://r2r.tech/products/roll-2-roll-actuators For more information about the SCU5 controller please visit: https://r2r.tech/products/roll-2-roll-controller.
Transcript
Show full transcript (1887 words)
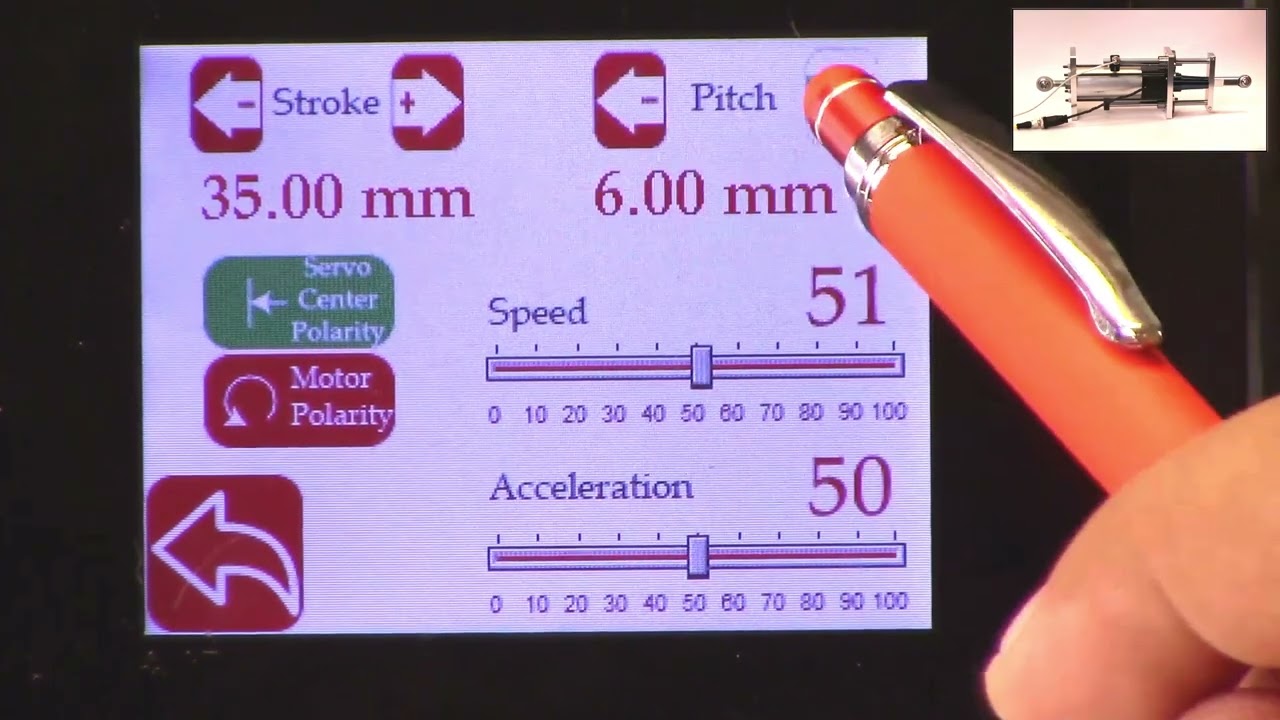
hello everyone this is arvind seshadri from Roll to roll Technologies today we're going to touch briefly about our actuator settings how do we set different parameters on the actuator on our scu5 all of our su5 controllers have the ability to connect to a variety of different actuators that are driven by stepper Motors we provide our own drivers for it if you look at our documentation you can see that from the su-5 controller we go to a motor driver through the motor communication cable and from the motor driver we go to the actuator through the actuator cable because we have the flexibility to connect a multiple different types of actuators we also provide the ability to set up some of the parameters of the actuator through our su5 controller that's what we're going to look at today and we're going to see how to set the stroke of the actuator the pitch of the actuator the speed the polarity and so on and so forth we do have our one of our actuator connected right now to the scu5 controller and that's the one right here and this is this is our standard upgrade kit actuator and this one has a front spherical eye and a rear spherical eye and then it has bearing supporting the the actuator to extend and retract and this is our LHS series with a four inch stroke this actuator also has a Servo Center sensor that is installed right here and that's actually looking at the rail that is going in and out the servo Center basically allows us to quickly Center the actuator or home the actuator to a position which makes the web guide be parallel to the other rollers within the machine we'll also go through that in another video but essentially we have our actuator connected here and then if you use our sc5 controller to move the actuator you can see that the actuator is moving back and forth and that's also seen on this bar graph right there so we'll take a look at how we're going to set some of the parameters that can be done by going into the tools icon and then power user and then actuator and this provides you with some of the settings that are currently available and this shows a pitch of 0.25 inch a stroke of 1.38 inch there's also a motor polarity setting here and then the speed and the acceleration but when we ship our controller we based on the actuator that is purchased we preset those values in the controller and ship it but if you want to change it it's pretty simple so for example if I want to change the speed I can just drag this right there and set the speed and we can also change the acceleration the speed and the acceleration can be changed independently and the pitch of the actuator is depending upon what the actuator is and that is basically one revolution of the motor how much is the actuator going to extend or attract in our case this particular actuator has a pitch of 0.25 inches and that's what it is set up there if you need to change the pitch you can just press this button and it's going to increment or decrement the pitch the units right now is shown is in inches and if you want to see those units in millimeters you can go to this screen hit the operator icon hit the display and change the units to millimeters and once you do that you can go back to the power user actuator and you can see that the actuator units are now in millimeters this is about 6.5 or 0.25 inch approximately and then the stroke is 35 millimeters and you can probably set it to the stroke on the actuator the stroke that you set is not the actual mechanical stroke that is available on the actuator this is just an electronic limit in order to avoid some of the pitfalls with existing some of the other actuators that are available where if there's issue let's say the web breaks the actuator may go back go to one side and it might keep driving because it has Reach This limit it doesn't know it has reached this limit and it keeps driving it and that might burn out the actuator to prevent that from happening in our case we actually have an electronic limit that means that if the actuator reaches its electronic limit whether the actuator whether there is a mechanical limit or not it will stop just to show you how that works I'm going to set the stroke to be some really small number let's say 30 millimeters and if I go back to the home screen and I try to jog the actuator you can see that it's going in and right now the actuator position is it's showing that it has reached it's fully retracted limit even though if you look at this actuator there's a lot of stroke remaining so if you look at here there's still a lot of room for the actuator to retract more but it stopped at this electronic limit just to prevent it from burning or destroying the motor so the electronic limit can be any limit that you set and that limit of whatever that the stroke that I showed again if I go back to the screen and to the actuator you can see that the 30 what that 30 means is that it's going to be 15 from the middle of the actuator position and on one side and then 15 on the other side and that's what the stroke means so if you are in the middle position of the actuator you can go 15 on one side and 15 on the other side that's what the stroke means in terms of setting there's also the polarity so what we can do is we can change the polarity and if you remember when I did this when I pressed the Plus it was going in a certain direction and if I do this when I press the plus it's actually extending in the previous case when I pressed the plus it was actually retracting and that's also shown here in this position when the polarity is the standard polarity the plus will increase the actuator position and that's what this is showing and the negative will decrease the actuator position so it's retracting if we reverse the polarity then it will do the opposite and again when we reverse the polarity that it clearly shows here now if we press the plus it's extending retracting and then if you do the minus it's actually extending so the polarity can be changed as I'm moving the jogging the actuator back and forth one of the things that you can notice is that the this bar graph changes color and right now it's in yellow or Amber and then if I go to another limit and now it becomes red this is more evident in the other direction so if I go all the way in the other direction this is going to be yellow and then if I go reach a certain it goes to Red this is a quick visual indication for the operator to know that the actuator is close to its extreme position if not at the extreme position if it's in red it's within 10 percent of the extreme position limit and if it is in yellow then it's between 20 percent to 30 percent of the extreme limit so we don't typically like to run the web guide in this position is that there's not enough room for correction in this direction so if there is an error in this direction and the actuator needs to move that way there's not enough room to correct for it so anyway a quick visual indication for us to see where the actuator is again if you want to see that in a bigger screen if you just click on that motor icon then you can see that the same bar graph that you saw on the home screen that's essentially the things with regard to the stroke and the pitch and the the speed and the polarity again just to reiterate there is a difference between the mechanical limits and the electronic limits the mechanical limits are the actuator cannot move anymore because it's mechanically inhibited and we never want to set that actuator or install the actuator in that scenario where the mechanical limits are reached the electronic limits are just safely limits and this allows us to stop the actuator from moving even before it reaches the mechanical limits so we typically suggest that you install the actuator move it back and forth find the Home position set the home position or this Servo Center position and then set a certain stroke and then jog all the way to one side make sure that it doesn't hit the electronical limits and jog all the way to the other side and make sure that it doesn't hit the mechanical limits and as long as it doesn't then the electronic limits are fine if in any scenario whether you're going jogging left or jogging right it hits the mechanical limits then you would have to reduce the electronic limits so we never get into that situation where the actuator might hit the mechanic that's all we need to do in terms of setting up the actuator in terms of the stroke and the pitch there are other few functionalities that are available for certain controllers for example the actuator position if it reaches the extreme position there is a way for us to set digital outputs so that not just an operator needs to look at it but the digital output can provide a signal to the PLC to alert PLC that hey the actuator has reached this limit the other option that we have this is mainly for our big actuators that are moving the unwinds and rewinds which are susceptible to damage if we reach the mechanical limit that we can add additional limit switches either mechanical limit switches or even electronic limit switches make sure that the mechanical limits are never reached and if we have that option if we have the hardware provided with your actuator then you have the ability to enable them the way to do that is to get into the tools and then the power user and then in the controller there's this limit switches icon button and then we just need to turn on the limit switches if you don't have the limit switches and you turn on the limit switches the actuator might not move just be aware of that but if you do have the limit switches and you want to enable that functionality then you can enable that functionality by turning on the limit switch so those are the basics of the actuator settings in terms of stroke pitch polarity limits and limit switches in a subsequent video we'll talk about the servo Center functionalities but in the meantime do subscribe to our Channel and we'll see you in the next video